|
|
Introduction
The idea for the wind speed and direction sensor was to only have the one device, but measure both speed and direction. It is possible to buy kits to build such devices, but I wanted to figure out how it worked and build one for myself.
Design
As the idea was to detect both speed and direction using only the one device, a means to ascertain direction is necessary. This is achieved by including a flap on one of the cups - when moving with the wind, this should cause a slight increase in speed. Against the wind should cause a slight decrease. A code disk inside the unit is used to measure the cups spinning; but a means to identify an origin is required to find the direction of the wind. This is done using an extra slot on the code disk.
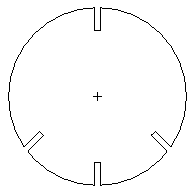
Code disk
This shows the code disk template. It is divided into 3 sections of pie, each 120 degrees of the circle. One of these is further divided into two 60 degree halves.
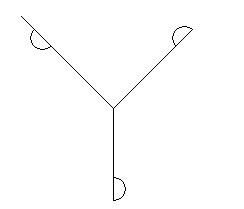
Cups
This simply shows the cups, one of which has a tab.
Algorithm
To calculate both wind speed and direction, it is a simple matter of recording the time between each slot. This will result in measurements A, B, C and D.
Speed
Simply add all 4 readings together, to find the time for one revolution. Using a known speed, this can quite simply be converted into meaningful speed.
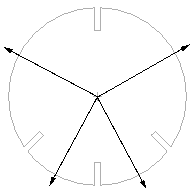
Direction
To compute the direction, simply use each of the values as vectors. Assuming you have identified the two smallest numbers in the array of 4, you will be able to apply them to the 4 angles presented by the code disk. These are 60 degrees, 150 degrees, 210 degrees and 300 degrees. Simply add these together, and the resulting vector should point towards the longest point as the cups went round. This will be when the cup with the flap is moving against the wind, and so will be pointing 90 degrees out from the actual wind direction. However, you don’t need to take this into account, as you must calibrate the device to know which way is north anyway.
Calibration
The device must be calibrated for use. Mark a "North" on the case, and generate a breeze in this direction (for example, having a friend drive you along at a specific speed while holding the device out the window, with it’s North pointing the same way as the cars - note that car speedometers are inaccurate, and a GPS may be useful here). Note the reading from the wind speed calculation, and note that this is the time taken for a complete revolution at the selected speed. For direction, the above calculation should already be producing degrees from North, all you need to know is what it’s currently reading, as this is the offset to recover a true North value. These calculated values are then constant for your device, and so can be hard-coded into the software.
Construction
Although I wanted to build it myself, I’m not actually very good at putting things together. Thus, my father put together most of the actual unit itself.
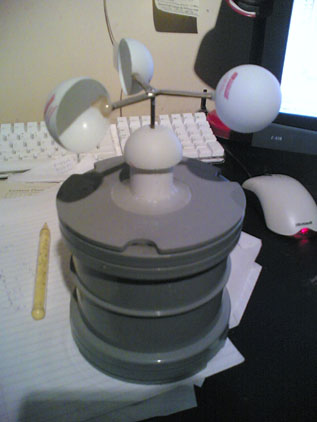
Components
The cups are halved ping pong balls, connected to small amounts of copper pipe soldered together to a central shaft. This passes through a bearing within a plastic pipe which houses the code disk and electronics. One of the cups has a small transparent plastic flap attached to alter it’s wind resistance. The unit contains no computational parts, simply an LED and a light sensitive transistor, through which the code disk passes. The output is then fed into the microcontroller running the weather station, detailed on another page of this site.
|